
Saral Transfer Paper
The Pushpin method leaves tiny dots you have to connect. The Sharpie Trace method requires tracing onto tissue paper first, then again onto the pumpkin. Saral transfer paper gets it done in one tracing step, directly from your printed stencil onto the pumpkin skin.
You lay the transfer paper flat against the pumpkin first, then place your printed stencil on top of it. Trace firmly over every line with a ballpoint pen, and the pressure transfers a clean colored mark directly onto the pumpkin skin beneath. Blue Saral paper works best. It shows up clearly against orange skin and is easy to follow when carving. It’s like old-fashioned carbon paper but much cleaner, with no greasy smudging.
The main downside is that transfer lines can rub off if the pumpkin gets wet, either from moisture in the air or juice seeping to the surface. Carve soon after transferring. If you need to transfer your stencil days before you carve, a light spray of matte fixative over the lines locks them in place and prevents smearing.
Saral paper works for all carving styles. It’s completely dry, so nothing distorts or shrinks. You can find it at art supply stores or online.
How to use Saral transfer paper:
- Make sure your pumpkin is completely dry.
- Place the Saral paper blue side facing the pumpkin skin, then lay your printed stencil on top of it. Go to Attach Your Stencil to attach both layers to your pumpkin, then return here.
- Trace firmly over every line with a ballpoint pen, pressing hard enough to transfer the mark without ripping through the stencil.
- Before removing anything, lift one corner of the stencil carefully to check the lines transferred clearly.
- Remove the stencil and transfer paper and you’re ready to carve.
Stick ’n Carve Sheets
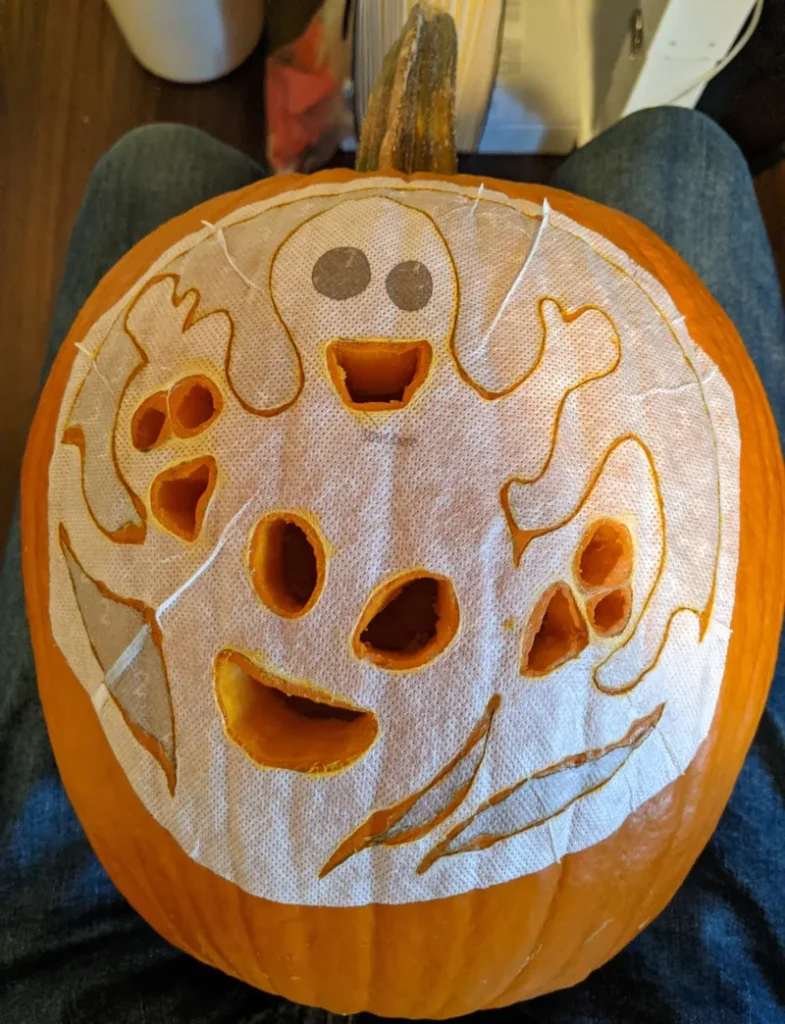
Stick ’n Carve sheets are sold at zombiepumpkins.com and are genuinely the fastest stencil transfer method out there. There is no transfer step at all. You print your stencil directly onto the fabric side of the sheet using a regular home printer. Cut out the design leaving about a 1” (2.5 cm) white border. Then starting at the top, peel off some of the backing and attach the sticky fabric sheet onto the pumpkin like a big sticker. Then you carve straight through the sheet, following the printed lines as you go. When you’re done, I recommend just peeling off what’s left. You can dissolve it with water, but it tends to leave a big sticky, goopy mess.
The sheet is thin enough that a pumpkin carving saw cuts right through it without any resistance, and because it sticks directly to the pumpkin skin, nothing shifts around while you work. The fabric also molds to the curved surface of the pumpkin much more easily than regular paper. For a simple sawing stencil, this method is really convenient.
There’s one catch, though. Stick ’n Carve sheets are designed to dissolve in water, and pumpkin juice is mostly water. The moment your saw cuts through the pumpkin wall, juice starts seeping to the surface. That juice causes the sheet to shrink and pull back slightly around the hole you just cut.
For saw holes, this doesn’t matter. You’ve already cut them out. But if your stencil also has scrape lines or Sharpie lines near those saw holes, the shrinking sheet will distort or pull those lines out of position before you can follow them. This makes Stick ’n Carve unreliable for any style that mixes saw holes with scraping or Sharpie work.
Stick ’n Carve is best for Style 2 sawing stencils only.
For all other styles, use the Sharpie Trace method, the Pushpin method, or Saral transfer paper instead.
Tips for best results with Stick ’n Carve:
- Test with a scrap piece of paper first to confirm which side your printer feeds. You need to print on the fabric side of the sheet.
- Don’t take the whole backing off at first. Start with just the top and slowly peel the backing as you attach it to the pumpkin.
- Press the sheet firmly and smooth out any bubbles as you go. Gaps let the sheet lift while carving.
- You may want to print a second regular paper copy of your stencil to keep as a reference. Once the sheet is sawed through on the pumpkin and gets wet, it will shrink, and you might not be able to read the lines.
- Work quickly on areas close together. The more saw holes you cut, the more juice reaches the surface.
- Carve the smallest, most detailed holes first before juice has a chance to build up around them.
Free download
Get The Ultimate Book on Pumpkin Carving — free
64 chapters covering every technique, every tool, and all nine carving styles. Written by someone who has carved pumpkin portraits for over 30 years and taught 500+ kids. Illustrated with real carvings by the author and his students.
Get the free book →Free to download. Works on iPhone, iPad, Android, and computer.